
Welcome back! It’s time for the second lesson in the how-to write series. This week we are looking at the opening image, the first beat in your story. You can find some great info and graphics here, at the Save The Cat website that can help if you feel lost. If you haven’t visited yet, I highly recommend. There are free beat sheet templates by genre!
What is the Opening Image?
Opening Image is simply a term that refers to the opening of your story. It is the first scene you give an audience. Often, this is the first peek at the life of your main character. Pretty obvious, right? But there is a deeper purpose to this beat.
The opening image sets up the tone, style and mood of your story (terms listed at end of post). If you’re writing a thriller, your readers first peek should be exciting; filled with suspense or danger. If your story is a comedy, then something funny should be happening. In general terms, the opening image is supposed to give the reader a clear sense of your writing style and the kind of story they are in for. Each of these can all be identified by looking at the story setting, characters, detail and word choice; all things that come out — often without even thinking about it — as you write your opening scene.
Another way to think of the opening image is to look at it as the “before.” Before your main character’s life is upended. Before the call to adventure comes… calling.
Before their world is thrown into chaos by the inciting incident. The opening image, no matter the medium, gives readers/audiences a visual presentation of you main characters life. But it also gives us a look at their flaw. I will be doing a detailed post on The Flaw in the near future but, for now, just know that the Flaw is a symptom of their deepest issue, and an important part of the opening image.
Remember, even in novels, there needs to be visual representations of your character’s problem. If your protagonist’s deepest issue is trust, then how will that manifest? You can google ideas for this type of stuff, or go with what you know. Much of this portion of character development will take place in pre-writing stages.
Pre-writing links:
- choosing the setting
- Kindlepreneur advice on character-building
- character profile questions
- character archetypes
- ultimate character profile template
- 10 tips for writing flawed characters
- world-building
The primary purpose of the opening image, as it gives audiences a snapshot of your characters “before” life, is to showcase their flaw. We need to identify the big shortcoming that will get in their way as their story moves forward. The Flaw is the thing that they must face in the hero’s final test.
The Flaw
As mentioned before, I will write in more detail about the flaw in later posts, but for now, know that writing a believable flaw is easy if you imagine the flaws of the people you love. But, when you apply that flaw to your main character, it needs to get bigger. Deeper. Psychological. To put it simply, the protagonists flaw is a key component to your plot and the character’s journey so it needs to be a little more complex than a simple flaw. Young Screenwriters have an amazing explanation of the flaw and the psychology of how the flaw is merely a manifestation of a much deeper wound in their free course, Writing the Scene. (Looking at resources for screenwriting is extremely helpful, even if you’re working on a novel. Screenwriting courses and books often give the most informative tips to develop writing skills. So check it out! ) When writing your character’s journey, the manifestation of their deeper wound has to surface in various ways so that it keeps getting in their way, and keeps the conflict rising.
Now that we’ve covered the basic components of the opening image, let’s take a look at an excellent example of the opening image. Tootsie: the film is about a struggling actor trying to find his big break. That is covered beautifully in the opening credits.
It’s done perfectly once again, in a very different way, in Kramer VS Kramer (@1:15):
Rather than showing us the cratering life of the main character, this story opens with a supporting character, the unhappy mother, making the choice to leave her world entirely, which upends the main characters world. In this case, it opens with the inciting incident. A brilliant way to start a story, that follows the sage advice of professor and screenwriter, John Warren, with regards to scene writing: “Get in late and get out early.”
Start every scene in the middle of the story, with action and end the scene with a question. Ending with a question is the key to bingeable stories. So, as you mold your opening scene, try to find a way to hint at the next problem or upcoming issue so a reader feels they have to turn the page.
Now, because we’ve talked so much about it…
The Hero’s Journey
If you’re not familiar with the Hero’s Journey, just know there are many different iterations, but they all cover the generalized steps of the narrative. The graphics below hold links to resources that explain Joseph Campbell’s Hero’s Journey in great detail. All the pages are great, but for me, the third graphic (and linked page) offers the most helpful and specific information on each step of the journey:
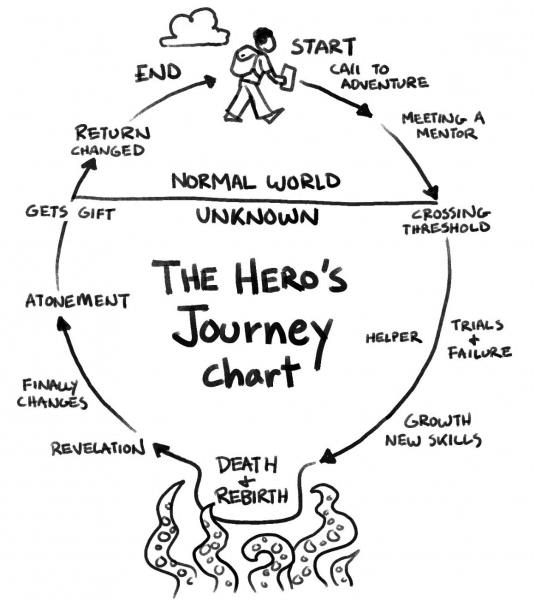

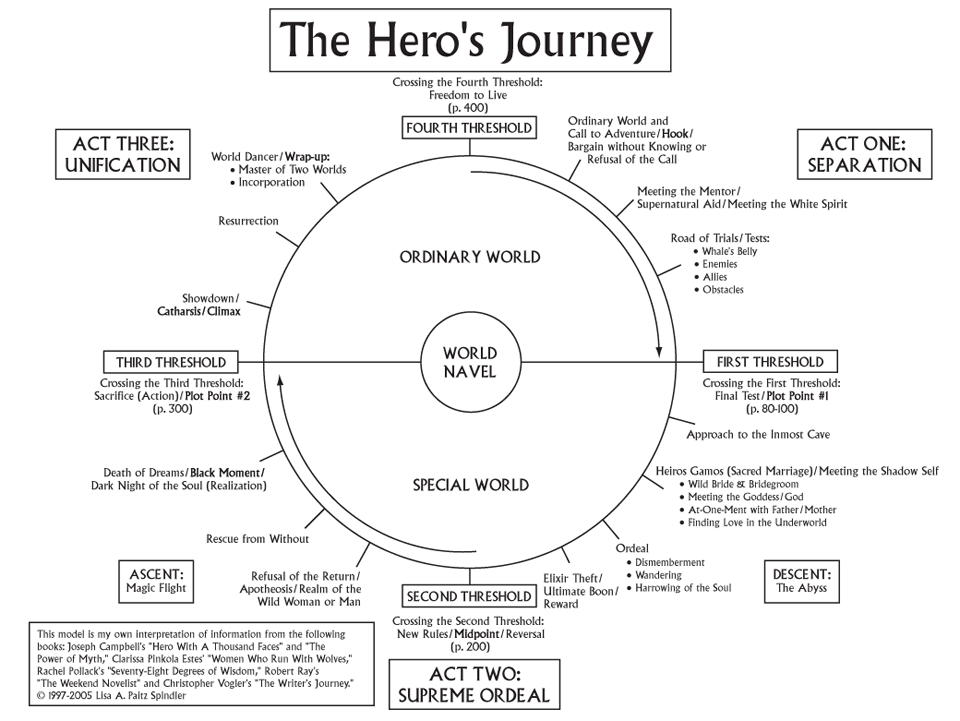
Here’s a quick summary directly from Save The Cat:
Terms I will likely use throughout out the series:
- tone: the expression of the author’s attitude.
- style: the author’s diction (word choice), the syntax and sentence structure, rhetorical patterns, etc.
- mood: the atmosphere of a story
- inciting incident: an event that sets the main character/s on the journey they’ll experience throughout the narrative.
- character arc: the changes that takes place in the character throughout the story.
- flaw: main characters weakness. Their big issue or problem they must overcome to be changed by the end of their story.
I hope you enjoyed the post! Hit me up in the comments section if you have any questions. I would love to hear from you!
Come back next week when we cover the second beat: The Set-Up
